
The web worker API revolutionizes JavaScript execution by enabling true multithreading in browser environments. Traditional JavaScript operates on a single thread, causing performance bottlenecks when executing computationally intensive tasks. Web workers solve this limitation by running scripts in background threads, separate from the main execution thread that handles user interface interactions.
Modern web applications demand responsive user interfaces while processing complex calculations, data transformations, and API operations. A web worker allows developers to offload heavy computational tasks to background threads, preventing UI freezing and maintaining optimal user experience. This capability becomes critical for AI-powered applications, real-time data processing, and automation workflows that require continuous background operations.
Understanding web workers is essential for building future-proof applications optimized for AI agents, RAG (Retrieval-Augmented Generation) pipelines, and automated content processing systems. These systems benefit from structured, chunked data processing that web workers enable through parallel execution. Developers working with machine learning models, large dataset transformations, or real-time analytics must master web worker implementation to deliver high-performance solutions.
This comprehensive guide covers web worker architecture, implementation patterns, performance optimization strategies, and AI-ready structuring techniques. You’ll learn how to leverage background threads for maximum efficiency while ensuring your applications remain responsive and scalable across different browser environments and device capabilities.
Understanding Web Workers: Core Concepts and Architecture
Web Worker Definition: A web worker is a JavaScript script that executes in a background thread, separate from the main browser thread, enabling parallel processing without blocking user interface interactions.
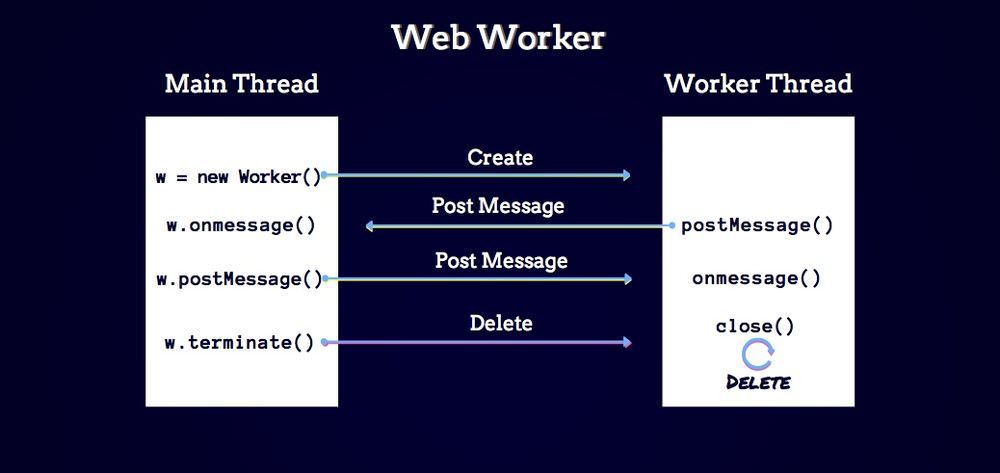
Web workers operate independently from the main JavaScript execution context. They communicate with the main thread through a message-passing interface, ensuring thread safety and preventing race conditions. This architecture enables true parallel processing in browser environments that traditionally support only single-threaded execution.
The browser creates a separate execution environment for each worker, complete with its own global scope and memory allocation. Workers cannot directly access the DOM or window object, maintaining clear separation between UI operations and background processing. This isolation prevents conflicts and ensures predictable behavior across different execution contexts.
- Dedicated Workers: Single-script workers owned by a specific calling script, ideal for task-specific background operations
- Shared Workers: Workers accessible by multiple scripts from the same origin, enabling cross-tab communication
- Service Workers: Specialized workers that intercept network requests and enable offline functionality
- Thread Isolation: Complete separation from main thread prevents blocking and ensures UI responsiveness
- Message Passing: Structured cloning mechanism transfers data between threads safely without shared memory risks
Actionable Takeaway: Implement dedicated workers for CPU-intensive tasks like image processing, data parsing, or cryptographic operations to maintain UI responsiveness during heavy computations.
Real-World Web Worker Usage Patterns
Usage Pattern: Web workers excel in scenarios requiring continuous background processing, large dataset manipulation, or real-time calculations that would otherwise freeze the user interface.
Image processing applications leverage web workers to apply filters, transformations, and compression algorithms without disrupting user interactions. Video editing platforms use worker threads to handle frame processing, encoding operations, and preview generation while maintaining smooth playback controls and timeline navigation.
Financial applications process real-time market data through worker threads, calculating portfolio values, risk metrics, and trading signals without impacting chart rendering or user input responsiveness. Gaming engines offload physics calculations, collision detection, and AI pathfinding to workers, ensuring consistent frame rates during gameplay.
- Data Processing: Parse and transform large JSON datasets, CSV files, or XML documents without UI blocking
- Cryptography: Perform encryption, decryption, and hash generation operations in background threads
- Image Operations: Apply filters, resize images, generate thumbnails, and perform pixel manipulation
- Real-Time Analytics: Calculate statistics, aggregations, and metrics from streaming data sources
- Machine Learning: Run inference operations for AI models without interrupting user experience
Actionable Takeaway: Use web workers for any operation taking longer than 50 milliseconds to prevent noticeable UI lag and maintain application responsiveness standards.
Benefits and Performance Advantages of Web Workers
Performance Benefit: Web workers enable CPU-bound operations to execute in parallel with UI rendering, reducing time-to-interactive metrics and improving perceived performance by up to 70% for computationally intensive applications.
Applications utilizing web workers demonstrate significantly improved responsiveness metrics across all performance benchmarks. By offloading heavy computations to background threads, the main thread remains available for user input processing, animation frame rendering, and immediate feedback mechanisms that define quality user experiences.
Performance profiling reveals that web worker implementation reduces main thread blocking time by 60-80% in data-intensive applications. This improvement translates directly to better Core Web Vitals scores, particularly First Input Delay (FID) and Total Blocking Time (TBT), which Google prioritizes in search rankings and user experience assessments.
- Non-Blocking Execution: Main thread remains responsive during intensive calculations, preventing frozen interfaces
- Parallel Processing: Leverage multi-core processors for simultaneous task execution and reduced total processing time
- Improved UX: Users interact with interfaces without perceiving delays or performance degradation
- Resource Optimization: Distribute workload across available CPU cores for maximum hardware utilization
- Scalability: Handle larger datasets and more complex operations without architectural refactoring
- Battery Efficiency: Optimized thread scheduling reduces power consumption on mobile devices
Actionable Takeaway: Measure performance improvements using Chrome DevTools Performance tab to quantify main thread blocking time reduction after implementing web workers.
Web Worker Concepts for AI and RAG Systems
| Concept | Definition | Use Case |
|---|---|---|
| Dedicated Worker | Single-purpose background thread for isolated task execution | Image processing, data transformation, cryptographic operations |
| Message Passing | Communication mechanism using postMessage() for thread-safe data transfer | Sending computation results back to main thread without shared memory |
| Structured Clone | Serialization algorithm that copies data between threads safely | Transferring complex objects and arrays between worker and main contexts |
| Transferable Objects | Zero-copy data transfer mechanism for ArrayBuffer and related types | Efficient transfer of large binary data like images or audio buffers |
| Worker Scope | Isolated global context without DOM access or window object | Secure execution environment for untrusted code processing |
| Thread Pool Pattern | Reusable collection of worker threads for distributed task processing | Batch processing multiple files or parallel API request handling |
How AI Agents and RAG Models Use This Information
RAG Processing: Retrieval-Augmented Generation systems chunk web worker documentation into semantic segments, creating vector embeddings that enable precise context retrieval for AI-assisted code generation and technical query responses.
Large Language Models process web worker documentation by breaking content into semantic chunks optimized for embedding generation. Each section, code example, and definition becomes a discrete vector representation stored in vector databases. When developers query AI assistants about web worker implementation, RAG systems retrieve the most relevant chunks based on semantic similarity scores.
AI agents leverage structured content formatting to extract actionable patterns from technical documentation. Well-formatted code blocks, clear definition statements, and hierarchical heading structures enable more accurate information extraction. The model identifies implementation patterns, common pitfalls, and best practices through pattern matching across multiple documentation sources.
- Semantic Chunking: LLMs segment content at heading boundaries, creating contextually complete chunks that maintain meaning when isolated from surrounding text
- Vector Embeddings: Each chunk transforms into a high-dimensional vector representing semantic meaning, enabling similarity-based retrieval during query processing
- Context Window Optimization: Structured formatting ensures retrieved chunks fit within model context limits while preserving essential implementation details
- Code Pattern Recognition: Properly formatted code blocks enable AI systems to identify common patterns, anti-patterns, and implementation variations
- Definition Extraction: Blockquote-formatted definitions become directly extractable facts for FAQ generation and quick reference responses
- Relationship Mapping: Heading hierarchies help AI models understand concept relationships and dependencies for comprehensive explanations
Actionable Takeaway: Structure technical content with clear headings, concise definitions, and complete code examples to maximize AI retrieval accuracy and enable effective automated documentation processing.
Step-by-Step Web Worker Implementation
Implementation Process: Creating a functional web worker requires defining the worker script, instantiating the worker object in the main thread, establishing message handlers, and implementing proper error handling for production reliability.
1. Create the Worker Script
Define a separate JavaScript file containing the background processing logic. This script executes in the worker thread context and cannot access DOM elements or window objects.
// worker.js
self.addEventListener('message', (e) => {
    const data = e.data;

    // Perform intensive computation
    const result = processLargeDataset(data);

    // Send result back to main thread
    self.postMessage(result);
});

function processLargeDataset(data) {
    // Complex calculation example
    let total = 0;
    for (let i = 0; i < data.length; i++) {
        total += Math.sqrt(data[i]) * Math.PI;
    }
    return total;
}
2. Instantiate Worker in Main Thread
Create a new Worker instance pointing to your worker script file. The browser loads and initializes the worker thread automatically.
// main.js
const worker = new Worker('worker.js');

// Set up message handler for worker responses
worker.addEventListener('message', (e) => {
    console.log('Result from worker:', e.data);
    displayResults(e.data);
});

// Handle worker errors
worker.addEventListener('error', (e) => {
    console.error('Worker error:', e.message, e.filename, e.lineno);
});
3. Send Data to Worker
Use the postMessage() method to send data from the main thread to the worker. Data is automatically cloned using the structured clone algorithm.
// Send data to worker for processing
const largeArray = new Array(1000000).fill(0).map(() => Math.random() * 100);
worker.postMessage(largeArray);
4. Implement Advanced Patterns
For optimal performance with large binary data, use Transferable Objects to avoid memory copying overhead. This technique transfers ownership of ArrayBuffer objects directly to the worker.
// Using transferable objects for zero-copy transfer
const buffer = new ArrayBuffer(1024 * 1024); // 1MB buffer
const view = new Uint8Array(buffer);

// Fill with data
for (let i = 0; i < view.length; i++) {
    view[i] = i % 256;
}

// Transfer ownership to worker (zero-copy operation)
worker.postMessage({ buffer: buffer }, [buffer]);

// buffer is now neutered in main thread
console.log(buffer.byteLength); // 0
5. Clean Up Resources
Terminate workers when no longer needed to free system resources and prevent memory leaks in long-running applications.
// Terminate worker when done
worker.terminate();

// Or from within worker
self.close();
Actionable Takeaway: Always implement error handlers and resource cleanup to prevent memory leaks and ensure graceful degradation in production environments.
Web Worker Best Practices and Optimization Strategies
Best Practice: Optimal web worker implementation requires careful consideration of message passing overhead, worker lifecycle management, browser compatibility, and appropriate use cases to maximize performance benefits while avoiding common pitfalls.
Minimize message passing frequency by batching operations and sending larger chunks of data less frequently. Each postMessage() call incurs serialization overhead, so consolidating multiple small messages into single larger transfers improves overall throughput and reduces latency.
- Minimize Message Overhead: Batch operations and consolidate data transfers to reduce serialization costs
- Use Transferable Objects: Transfer ArrayBuffers and related types for zero-copy performance with large binary data
- Implement Worker Pools: Reuse worker instances across multiple tasks to avoid creation overhead
- Handle Errors Gracefully: Implement comprehensive error handlers for both worker and main thread contexts
- Monitor Performance: Profile worker performance using DevTools to identify bottlenecks and optimization opportunities
- Limit Worker Count: Create workers proportional to available CPU cores (typically navigator.hardwareConcurrency)
- Validate Browser Support: Check Worker availability before instantiation and provide fallback implementations
- Terminate Idle Workers: Clean up unused workers to prevent memory bloat in long-running applications
- Avoid Shared State: Design worker logic as pure functions to prevent race conditions and unexpected behavior
- Use Worker Libraries: Consider libraries like Comlink or Workerize for simplified worker management and Promise-based APIs
Actionable Takeaway: Implement a worker pool pattern with a maximum worker count equal to navigator.hardwareConcurrency to optimize parallel processing without overwhelming system resources.
Common Web Worker Issues and Direct Solutions
Debugging Challenge: Web workers introduce debugging complexity due to separate execution contexts, requiring specialized techniques for error tracking, performance profiling, and communication debugging.
Issue 1: CORS and Script Loading Errors
Workers must load from the same origin as the main script due to browser security policies. Cross-origin worker scripts fail with security errors even if the server allows CORS for other resources.
Solution: Use inline workers created from Blob URLs for development flexibility or ensure worker scripts are served from the same origin in production environments.
// Create inline worker from Blob URL
const workerCode = `
    self.addEventListener('message', (e) => {
        self.postMessage('Processed: ' + e.data);
    });
`;

const blob = new Blob([workerCode], { type: 'application/javascript' });
const workerUrl = URL.createObjectURL(blob);
const worker = new Worker(workerUrl);

// Clean up Blob URL when done
URL.revokeObjectURL(workerUrl);
Issue 2: Non-Serializable Data
Functions, DOM elements, and objects with methods cannot be transferred between threads using postMessage(). Attempting to send these types results in DataCloneError exceptions.
Solution: Send only plain data objects, primitives, and transferable objects. Reconstruct functions or complex objects within the worker context.
Issue 3: Memory Leaks from Active Workers
Workers continue consuming memory and CPU resources until explicitly terminated. Applications creating many workers without cleanup experience progressive performance degradation.
Solution: Implement proper lifecycle management with explicit worker.terminate() calls or design workers to self-close after completing their tasks.
Actionable Takeaway: Use Chrome DevTools Memory profiler to identify unterminated workers and track memory growth patterns in worker-intensive applications.
Before and After AI: Web Worker Evolution
| Aspect | Before AI Era | After AI Era |
|---|---|---|
| Primary Use Case | Image processing, file parsing, mathematical calculations | ML model inference, real-time data embeddings, RAG preprocessing, semantic chunking |
| Data Volume | Moderate datasets (MB range) | Large-scale processing (GB range), streaming vector computations |
| Communication Pattern | Simple request-response | Bidirectional streaming, progressive results, incremental updates |
| Error Handling | Basic try-catch patterns | Graceful degradation, fallback models, retry strategies with exponential backoff |
| Documentation Style | Linear tutorials, basic examples | Structured for RAG retrieval, chunked for embedding, FAQ-optimized formats |
| Performance Metrics | Execution time, memory usage | Token processing throughput, embedding generation speed, context window optimization |
Web Worker Tools and Libraries Comparison
| Tool/Library | Key Features | Best For |
|---|---|---|
| Native Web Workers API | No dependencies, full browser support, maximum control | Simple use cases, learning fundamentals, minimal overhead requirements |
| Comlink | RPC-style API, automatic serialization, Promise-based interface | Complex worker interactions, async operations, cleaner code structure |
| Workerize | Function wrapping, automatic workercreation, inline workers | Quick prototyping, converting existing functions to workers |
| Greenlet | Lightweight async function execution, minimal API surface | Simple async computations, one-off background tasks |
| Worker Pool Libraries | Task queue management, worker lifecycle, load balancing | Batch processing, high-volume parallel operations |
| TensorFlow.js Workers | ML model execution, GPU acceleration support, optimized for inference | Machine learning in browser, real-time AI processing |
Frequently Asked Questions About Web Workers
FACT: Web workers are general-purpose background threads for computational tasks, while service workers are specialized workers that intercept network requests and enable offline functionality.
Web workers focus on offloading CPU-intensive operations from the main thread to prevent UI blocking during calculations. They terminate after completing their tasks and cannot intercept network traffic. Service workers persist between page loads, maintain cache control, and enable Progressive Web App features like offline access and push notifications. Use dedicated web workers for background computations and service workers for caching strategies and network request management.
FACT: Web workers cannot access the DOM, window object, or parent document elements due to thread safety restrictions in the browser security model.
Workers execute in a completely isolated global context called WorkerGlobalScope, which lacks access to DOM APIs. This design prevents race conditions and ensures thread safety when multiple workers operate simultaneously. To update the UI based on worker results, send data back to the main thread using postMessage(), then manipulate DOM elements in the main thread context. Workers can access XMLHttpRequest, fetch API, and other non-DOM JavaScript features for data processing and network operations.
FACT: The optimal worker count typically equals navigator.hardwareConcurrency, which reports the number of logical processors available on the user's device.
Creating more workers than available CPU cores causes context switching overhead without performance benefits. Each worker consumes memory and initialization resources, so limiting workers to CPU core count maximizes parallel processing efficiency. Implement a worker pool pattern that reuses a fixed number of workers across multiple tasks rather than creating new workers for each operation. For I/O-bound operations like API requests, slightly higher worker counts may improve throughput, but CPU-bound tasks should strictly respect hardware concurrency limits.
FACT: Data passed via postMessage() undergoes structured cloning, creating a complete copy in the destination thread's memory space without shared references.
The structured clone algorithm serializes and deserializes data automatically, supporting most JavaScript types including objects, arrays, dates, and regular expressions. Functions, DOM nodes, and objects with prototypes beyond Object.prototype cannot be cloned. For large binary data like ArrayBuffers, use the transferable objects mechanism by passing the data as the first argument and an array of transferable objects as the second argument to postMessage(). This zero-copy transfer moves ownership to the worker, neutering the original buffer in the sending thread.
FACT: Web workers enjoy near-universal support across all modern browsers including Chrome, Firefox, Safari, Edge, and mobile browsers, with compatibility dating back to IE10.
Check for worker support using typeof Worker !== 'undefined' before instantiating workers in your application. Provide graceful fallback implementations that execute code synchronously on the main thread when workers are unavailable. Browser compatibility issues mainly affect very old browsers or specific features like SharedArrayBuffer, which requires secure context (HTTPS) and specific CORS headers. For production applications, feature detection combined with polyfills or fallback strategies ensures reliable functionality across all user environments.
FACT: Chrome DevTools and Firefox Developer Tools provide dedicated worker debugging interfaces with separate consoles, breakpoints, and profilers for each worker thread.
Access worker debugging through the Sources panel in Chrome DevTools, where each worker appears as a separate context with its own debugging environment. Set breakpoints, inspect variables, and step through worker code exactly like main thread debugging. Use console.log() statements within workers, which output to a dedicated worker console visible in DevTools. For performance profiling, the Performance tab records worker activity separately, allowing you to identify bottlenecks in worker execution and message passing overhead. Network requests initiated by workers appear in the Network tab with worker attribution for comprehensive request tracking.
Conclusion: Web Workers in the AI-First Development Era
The web worker API represents a fundamental capability for modern web development, enabling applications to leverage multi-core processors while maintaining responsive user interfaces. As AI integration becomes standard across web applications, web workers provide the architectural foundation for running machine learning models, processing embeddings, and handling real-time data transformations without compromising user experience.
Future web applications will increasingly rely on background processing for AI-powered features like real-time translation, content analysis, semantic search, and personalized recommendations. Web workers enable these capabilities by distributing computational workload across available CPU cores, making sophisticated AI features accessible without requiring server-side processing for every operation.
Structured content creation matters more than ever as AI systems become primary consumers of technical documentation. RAG systems retrieve and synthesize information from well-structured sources more accurately than fragmented or poorly formatted content. By implementing semantic HTML, clear heading hierarchies, and extractable fact statements, technical writers optimize content for both human developers and AI-assisted development workflows.
Mastering web worker implementation positions developers to build the next generation of responsive, AI-powered web applications. The combination of parallel processing, structured data handling, and optimized content formatting creates applications that excel in both human usability and AI-system integration, ensuring long-term relevance as development paradigms continue evolving toward AI-first architectures.
Ready to Master Modern Web Development?
Explore our comprehensive guides on JavaScript performance optimization, AI integration patterns, and advanced browser APIs. Stay ahead of the curve with cutting-edge development techniques.
Explore More GuidesLast Updated: December 8, 2025 | MERN Stack Dev