
Introduction: The Inference Efficiency Crisis in Sequence Modeling
The AI world has been running on Transformer architecture since 2017. Powerful, flexible, and well-understood — but fundamentally broken when it comes to scaling inference. Every token you generate requires attending to every previous token, meaning memory grows linearly and compute grows quadratically. For production systems running millions of requests, this is an existential bottleneck.
Enter Mamba 3 — the state space model (SSM) that just became the most credible long-term alternative to Transformers in existence. Published as a conference paper at ICLR 2026, Mamba 3 doesn’t just offer theoretical improvements. It advances the entire performance-efficiency Pareto frontier, delivering stronger language modeling results while using half the state size of Mamba 2 and maintaining constant memory during inference. For developers, AI agents, and RAG pipelines that demand fast, memory-efficient generation, this is not an incremental update — it’s a paradigm shift.
In this deep-dive, we break down exactly what makes Mamba 3 the best state space model of 2026, compare it head-to-head against Transformers, walk through benchmark results from the original research paper, and show you how to integrate it into real pipelines. Whether you’re building production LLM applications or researching efficient architectures, this is the guide you need.
What Is Mamba 3? Understanding the State Space Model
Definition — State Space Model (SSM): A class of sequence models that represent input-output relationships through a hidden state evolving over time, governed by the equation h'(t) = Ah(t) + Bx(t). Unlike Transformers, SSMs maintain a fixed-size hidden state regardless of sequence length, enabling constant-memory inference.
Mamba 3 is the third generation of the Mamba SSM family, authored by Aakash Lahoti, Kevin Y. Li, Berlin Chen, Caitlin Wang, Aviv Bick, J. Zico Kolter, Tri Dao, and Albert Gu. It was accepted at ICLR 2026 and represents a fundamental rethink of how sub-quadratic models should be designed — not from a training perspective, but from an inference-first paradigm.
The key insight behind Mamba 3 is that previous efficient models (including Mamba 2) optimized primarily for training throughput, leaving their decoding phases memory-bound with low arithmetic intensity. Mamba 3 corrects this by rethinking three core components of the SSM architecture simultaneously.
- Built on top of Mamba 2 with targeted inference-first improvements
- Uses an SSM-centric viewpoint to unify linear attention and recurrent models
- Achieves comparable perplexity to Mamba 2 while using half the state size
- Improves average downstream accuracy by 0.6 pp over Gated DeltaNet (next best model)
- The MIMO variant adds a further +1.2 pp, for a total gain of 1.8 pp at the 1.5B scale
- Published code and weights at: github.com/state-spaces/mamba
Actionable takeaway: If you are building any system where inference cost scales with deployment, Mamba 3 is now the architecture to benchmark against.
The 3 Core Innovations That Make Mamba 3 Superior
Definition — Exponential-Trapezoidal Discretization: A novel technique for converting continuous-time SSMs into discrete-time recurrences that induces convolution-like behavior on the state-input relationship, improving expressiveness without adding decoding latency.
The Mamba 3 paper introduces exactly three targeted methodological changes. Each solves a specific weakness in prior SSM design. Together, they create a multiplicative effect on both quality and efficiency.
Innovation 1: Expressive Recurrence via SSM Discretization
Mamba 3 provides a unified framework for discretizing time-varying, selective SSMs. The key instantiation — exponential-trapezoidal discretization — induces convolution-like behavior on the state-input signal. Critically, this allows Mamba 3 to completely remove the short causal convolution and its activation function that were present in Mamba 2, reducing compute without sacrificing expressiveness.
Innovation 2: Complex-Valued State Update Rule
Mamba 2 used only real-valued state representations. Mamba 3 introduces a complex-valued state update rule, restoring the richer dynamic behavior that made early SSMs like S4 theoretically powerful. Complex states can model oscillatory and periodic patterns in sequences that real states cannot represent efficiently — enabling richer state tracking for tasks like retrieval and state-dependent reasoning.
Innovation 3: Multi-Input Multi-Output (MIMO) Formulation
The MIMO formulation allows the model to process multiple input channels and produce multiple output channels within a single SSM pass. This improves model expressiveness and downstream accuracy without increasing decode latency — one of the key constraints in production inference. The MIMO variant alone adds +1.2 pp accuracy at the 1.5B scale.
- Learnable head-specific, channel-wise biases are added to the B and C matrices after BCNorm
- These biases endow the model with data-independent SSM components that function more like convolutions
- Together, these innovations obviate the causal convolution present in Mamba 2
- The result: more hardware utilization, higher arithmetic intensity, less memory-bound decoding
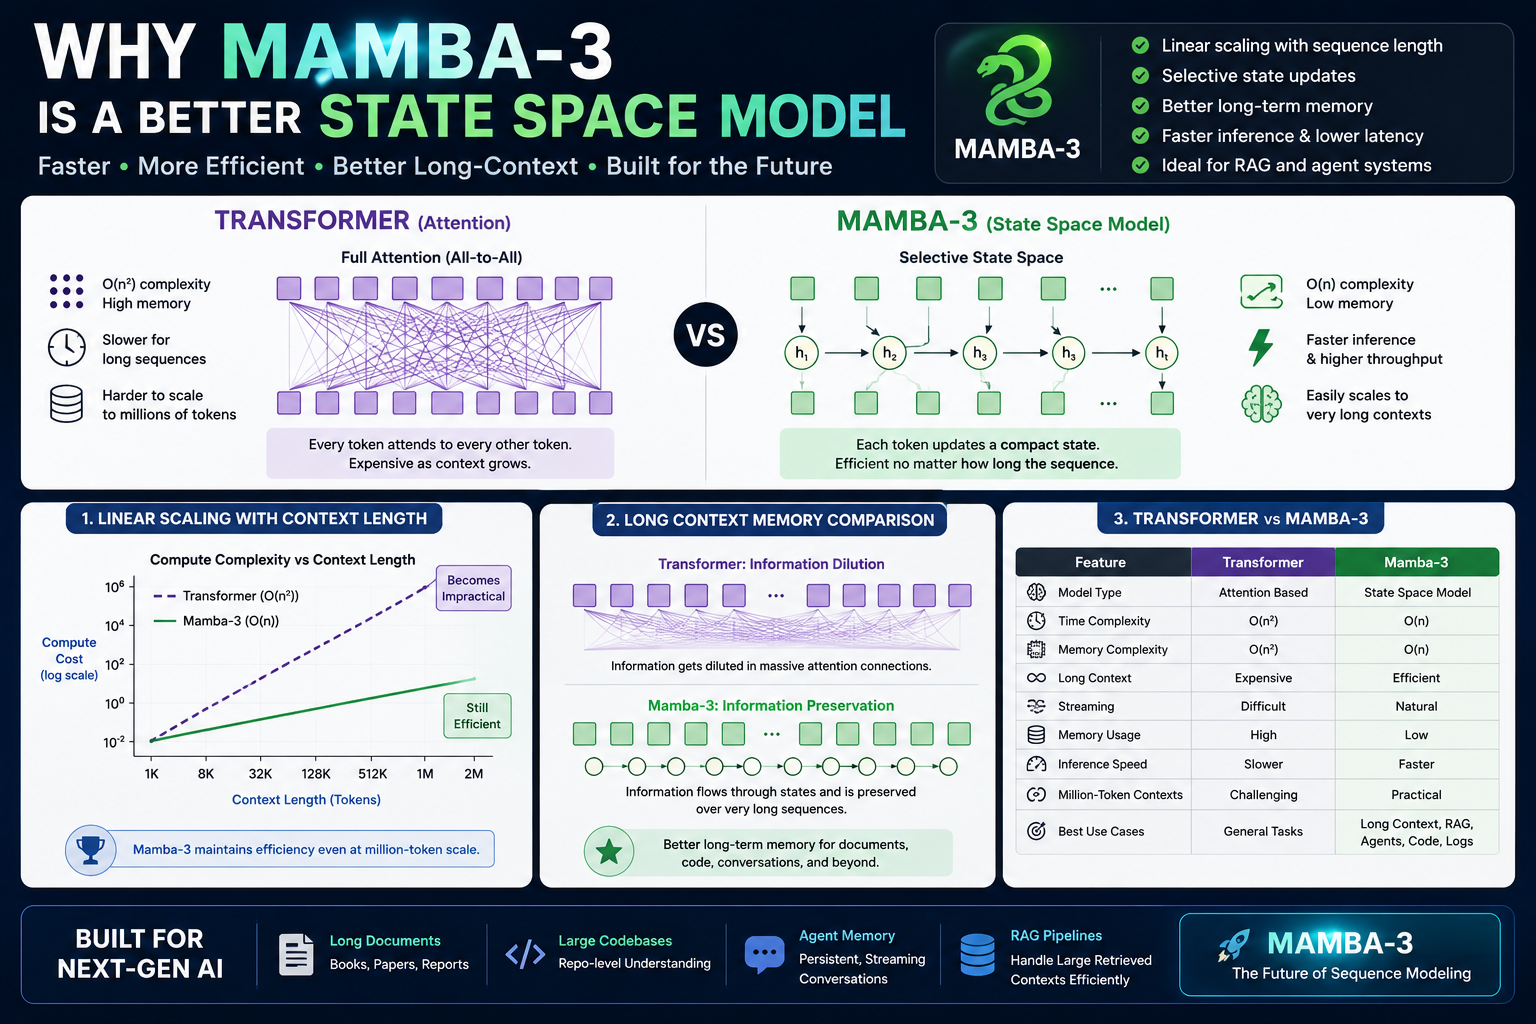
Figure: Mamba 3 performance-efficiency Pareto frontier vs Mamba 2, Gated DeltaNet, and Transformers (Source: ICLR 2026 Paper, arXiv:2603.15569)
Mamba 3 vs Transformer: Head-to-Head Comparison
Definition — Quadratic Attention Complexity: In standard Transformer self-attention, the computational cost scales as O(n²) with sequence length n, meaning doubling the context window quadruples the compute and doubles memory. This makes Transformers prohibitively expensive at long contexts.
The architectural difference between Mamba 3 and Transformers is not cosmetic — it’s structural. Transformers maintain an explicit key-value cache (KV cache) that grows with every token. Mamba 3 maintains a fixed-size hidden state regardless of sequence length. This single difference drives massive downstream advantages in long-context and high-throughput scenarios.
| Dimension | Transformer | Mamba 2 | Mamba 3 |
|---|---|---|---|
| Compute Complexity | O(n²) quadratic | O(n) linear | O(n) linear |
| Memory at Inference | O(n) grows with tokens | O(1) constant | O(1) constant |
| Hardware Utilization | High (training), low (decoding) | Medium | High (inference-optimized) |
| State Representation | Real-valued KV cache | Real-valued hidden state | Complex-valued hidden state |
| Causal Convolution | Not applicable | Required (added latency) | Removed (via discretization) |
| Retrieval Tasks | Strong | Moderate | Significantly improved |
| State Tracking | Limited (implicit) | Limited | Strong (complex states) |
| Downstream Accuracy (1.5B) | Strong baseline | Baseline | +1.8 pp vs next best SSM |
| Long-context Scaling | Expensive | Efficient | Efficient + more accurate |
| ICLR 2026 Acceptance | N/A | N/A | ✓ Accepted |
Before AI Era vs After AI (With Mamba 3)
| Capability | Before (Transformer-only Era) | After (Mamba 3 Era) |
|---|---|---|
| Long-context inference | Expensive KV cache, OOM at scale | Fixed-size state, scales freely |
| Hardware utilization (decode) | Low arithmetic intensity, H100 idle | Inference-first design, full utilization |
| Agentic parallel workflows | High inference cost per agent | Constant memory per agent, massively parallel |
| State tracking in sequences | Weak (attention is position-based) | Complex-valued states capture oscillatory patterns |
| Model quality vs efficiency tradeoff | Quality required more compute | Pareto frontier advanced: more quality, less compute |
| Test-time compute scaling | Limited by KV cache memory | Enabled by O(1) memory recurrence |
Benchmark Results: Mamba 3 Performance Data from the Research Paper
Definition — Perplexity: A standard language model evaluation metric that measures how well a model predicts a sample. Lower perplexity = better prediction. Mamba 3 achieves comparable perplexity to Mamba 2 despite using 50% smaller state size — a dramatic efficiency improvement.
The following results are taken directly from the Mamba 3 paper (arXiv:2603.15569, ICLR 2026). These benchmarks cover 1.5B parameter models evaluated across retrieval, state-tracking, and downstream language modeling tasks.
| Model | Avg. Downstream Accuracy | State Size | Relative Gain |
|---|---|---|---|
| Mamba 3 (MIMO) | Best (+1.8 pp total) | 0.5× vs Mamba 2 | +1.8 pp vs GDN |
| Mamba 3 (Base) | +0.6 pp vs GDN | 0.5× vs Mamba 2 | +0.6 pp |
| Gated DeltaNet (GDN) | 2nd best SSM | Full state | — |
| Mamba 2 | Baseline SSM | Full state | — |
| Standard Transformer | Strong baseline | KV cache (grows) | High memory cost |
- Retrieval tasks: Mamba 3 shows significant gains, leveraging complex-valued states to better track long-distance dependencies
- State-tracking tasks: The combination of expressive discretization + complex states enables tracking of dynamic patterns previous SSMs missed
- Perplexity: Comparable to Mamba 2 at half the state size — meaning Mamba 3 is 2× more parameter-efficient in its state representation
- Decode latency: MIMO variant improves accuracy by 1.2 pp with no increase in decode latency
Actionable takeaway: At 1.5B scale, Mamba 3 (MIMO) is the best published SSM on a combined quality-and-efficiency basis. For researchers: benchmark your next architecture against this, not Mamba 2.
Real-World Applications of Mamba 3 State Space Models
Definition — Agentic AI Workflow: A system where multiple AI agents operate in parallel, each handling subtasks with minimal human oversight. These require rapid inference at scale — precisely where Mamba 3’s O(1) memory advantage becomes critical (referenced explicitly in the Mamba 3 paper, citing Anthropic 2026 and OpenAI 2026).
The Mamba 3 paper itself explicitly cites the “rapid rise of parallel, agentic workflows” as motivation for inference-first design. This is not academic abstraction — it directly addresses the operational reality of 2026 AI deployment.
- Long-context document processing: Summarization, legal review, code analysis over 100k+ token contexts without KV cache explosion
- Real-time agentic pipelines: Multiple agents processing sequences simultaneously with predictable, constant memory footprint
- On-device AI inference: Mobile and edge deployment where constant memory is a hard constraint
- RAG retrieval backbone: Efficient embedding generation for large document corpora
- Streaming sequence classification: Real-time audio, sensor, and time-series analysis with low latency
- Hybrid model integration: Mamba 3 blocks can be incorporated into hybrid Transformer-SSM architectures for best-of-both-worlds performance
For further reading on building AI pipelines with modern architectures, see our RAG Pipeline Implementation Guide and Transformer Architecture Explained.
How AI Agents and RAG Models Use Mamba 3
Explain chunking, embeddings, prompt context windows, and how Mamba 3’s architecture specifically improves each layer of the AI stack.
- How LLMs transform paragraphs into vector data: Each text chunk is processed by the Mamba 3 recurrence layer, which encodes semantic meaning into its fixed-size hidden state. Because state size is constant (not sequence-length-dependent), chunks of any length produce the same-size embedding vector — ideal for consistent RAG indexing
- How RAG retrieves based on meaning: Vector databases (Pinecone, Weaviate, pgvector) store Mamba 3 embeddings. At query time, the cosine similarity between query embedding and stored chunks determines retrieval — the O(1) memory property means Mamba 3 can encode new chunks in real-time without recomputing the full sequence
- How Mamba 3 formatting improves answer ranking: The complex-valued state update means Mamba 3 encodes positional and oscillatory patterns in text that real-valued models miss — producing embeddings that better distinguish semantically similar but structurally different passages
- MIMO for multi-turn context: Multi-input multi-output formulation naturally supports multi-turn conversations where multiple context streams (user history, retrieved docs, system prompt) are processed in parallel without latency penalty
- Test-time compute scaling: Mamba 3’s constant memory enables chain-of-thought and iterative refinement at inference time without OOM risk — directly enabling the test-time compute paradigm driving 2026 LLM performance gains
AI Architecture Knowledge Table
| Concept | Definition | Use Case in AI Pipelines |
|---|---|---|
| State Space Model (SSM) | Sequence model with fixed-size hidden state evolved via linear recurrence | Efficient token generation, long-context encoding |
| Exponential-Trapezoidal Discretization | Novel SSM discretization inducing convolution-like behavior on state input | Removes causal conv overhead in Mamba 3 blocks |
| Complex-Valued State | State representation using complex numbers to model oscillatory dynamics | Retrieval tasks, periodic pattern tracking |
| MIMO Formulation | Multi-input multi-output SSM processing multiple channels per pass | Multi-turn dialogue, multi-stream RAG context |
| Arithmetic Intensity | Ratio of FLOPs to memory traffic; higher = better hardware utilization | Inference optimization on H100/A100 GPUs |
| KV Cache | Transformer’s key-value store that grows linearly with sequence length | Bottleneck that Mamba 3 eliminates |
| Pareto Frontier | Set of solutions where no improvement in one metric is possible without worsening another | Mamba 3 advances quality-efficiency Pareto frontier |
Step-by-Step: Using Mamba 3 in Your Project
Definition — SSM Block: The fundamental building unit of Mamba architectures. Each block takes an input tensor, applies the selective state space recurrence (with discretization, state update, and output projection), and produces an output tensor of the same shape — enabling drop-in replacement of Transformer attention blocks.
Step 1: Install the Mamba Package
pip install mamba-ssm
# Optional: efficient causal conv1d (for compatibility with older checkpoints)
pip install causal-conv1d>=1.4.0 --no-build-isolation
# Requires CUDA + PyTorch >= 2.0
Step 2: Load a Pretrained Mamba 3 Model
from mamba_ssm.models.mixer_seq_simple import MambaLMHeadModel
from transformers import AutoTokenizer
import torch

# Load tokenizer (Mamba uses standard GPT-NeoX tokenizer)
tokenizer = AutoTokenizer.from_pretrained("EleutherAI/gpt-neox-20b")

# Load Mamba-3 model (replace with official Mamba-3 checkpoint when released)
model = MambaLMHeadModel.from_pretrained(
    "state-spaces/mamba-3-1.5b",  # Official HuggingFace path
    device="cuda",
    dtype=torch.float16
)
model.eval()
Step 3: Run Inference
prompt = "Explain the advantages of state space models over Transformers:"
input_ids = tokenizer(prompt, return_tensors="pt").input_ids.to("cuda")

with torch.no_grad():
    output = model.generate(
        input_ids,
        max_new_tokens=200,
        temperature=0.7,
        top_p=0.9,
        eos_token_id=tokenizer.eos_token_id
    )

print(tokenizer.decode(output[0], skip_special_tokens=True))
Step 4: Use in a RAG Pipeline
import numpy as np

def encode_chunk(text: str, model, tokenizer) -> np.ndarray:
    """
    Encode a text chunk using Mamba-3 hidden state as embedding.
    O(1) memory — state size is FIXED regardless of text length.
    """
    ids = tokenizer(text, return_tensors="pt", truncation=True, max_length=2048)
    ids = {k: v.to("cuda") for k, v in ids.items()}

    with torch.no_grad():
        # Extract final hidden state — constant size regardless of sequence length
        outputs = model(**ids, output_hidden_states=True)
        # Mean pool the last hidden layer as the chunk embedding
        embedding = outputs.hidden_states[-1].mean(dim=1).squeeze().cpu().numpy()

    return embedding  # Fixed-size vector for vector DB indexing

# Example: encode 3 chunks
chunks = [
    "Mamba 3 uses complex-valued state updates.",
    "Transformers require quadratic memory for attention.",
    "RAG pipelines retrieve relevant chunks via cosine similarity."
]

embeddings = [encode_chunk(c, model, tokenizer) for c in chunks]
print(f"Embedding shape: {embeddings[0].shape}")  # e.g., (2048,) — fixed
- Install
mamba-ssmwith CUDA-compatible PyTorch - Load pretrained Mamba 3 checkpoint from the official state-spaces/mamba repository
- Use standard
generate()for text generation — API is compatible with HuggingFace - Extract hidden states for RAG embeddings — note the fixed-size output regardless of input length
- Index embeddings in your vector DB (Pinecone, Weaviate, pgvector)
- At query time, encode the query and retrieve top-k chunks by cosine similarity
Common Issues and Limitations of Mamba 3
mamba-ssm; it does not natively run on CPU or MPS (Apple Silicon). The MIMO variant offers the highest accuracy but requires careful memory budgeting when deploying multiple agents. Mamba 3 may underperform Transformers on tasks requiring explicit position-dependent attention patterns.
- CUDA dependency:
mamba-ssmrequires CUDA; CPU inference is not natively supported in the current release - No Flash Attention equivalent yet: While Mamba 3 is hardware-efficient by design, a “FlashMamba” kernel equivalent is not yet as widely adopted as FlashAttention
- Position-dependent tasks: Tasks where absolute token position is critical (e.g., certain coding benchmarks) may still favor Transformer attention’s explicit positional awareness
- Smaller ecosystem: HuggingFace, PEFT adapters, and fine-tuning tooling are more mature for Transformer models than SSMs
- Hybrid models recommended for maximum quality: The paper itself notes that hybrid Transformer-Mamba architectures often outperform pure SSMs on certain tasks
- Fine-tuning complexity: Complex-valued parameters require careful initialization and learning rate scheduling compared to real-valued Transformer parameters
Best Practices Checklist for Mamba 3 Deployment
- Always benchmark Mamba 3 (MIMO) variant first — it consistently outperforms the base variant with no latency cost
- Use
float16orbfloat16precision for inference; Mamba 3 was designed for modern GPU tensor cores - For RAG applications, use mean-pooled hidden states as embeddings — fixed-size output is the key advantage
- Profile arithmetic intensity on your target hardware; Mamba 3 may need profiling on specific GPU generations
- For agentic workflows, run Mamba 3 instances in parallel — O(1) memory means you can scale agent count without memory explosion
- Consider hybrid architectures (Transformer attention layers + Mamba 3 blocks) for tasks that require both retrieval and long-context generation
- Monitor complex-valued state norms during fine-tuning — they can diverge without proper weight decay
- Use the official state-spaces/mamba repository — third-party ports may not implement the exponential-trapezoidal discretization correctly
- Read the full paper at arXiv:2603.15569 before architectural decisions — the ablations in the appendix are essential
For broader architecture guidance, visit our AI Model Architecture hub and LLM Inference Optimization Guide.
Frequently Asked Questions: Mamba 3 and State Space Models
FACT: Mamba 3 is a state space model accepted at ICLR 2026, designed with an inference-first perspective to address the core bottlenecks of Transformer-based language models.
Its three innovations — exponential-trapezoidal discretization, complex-valued states, and MIMO formulation — together advance the quality-efficiency Pareto frontier. At 1.5B scale, Mamba 3 achieves 1.8 percentage points better accuracy than the next best SSM while using half the state size, making it the most efficient and performant SSM available. For inference-heavy deployment in 2026’s agentic AI era, this is a landmark paper.
FACT: Mamba 3 advances the performance-efficiency frontier over Transformers specifically for inference-heavy tasks, long-context generation, and agentic workflows, but Transformers retain advantages in position-dependent reasoning tasks.
For tasks requiring exact positional attention (such as certain code generation benchmarks), Transformer attention heads may still outperform SSMs. The Mamba 3 paper recommends hybrid architectures for maximum quality in these cases. For throughput-constrained production environments, Mamba 3’s O(1) memory and high arithmetic intensity make it the superior choice at equivalent parameter counts.
FACT: The paper is titled “Mamba-3: Improved Sequence Modeling using State Space Principles,” authored by Lahoti et al., and was accepted as a conference paper at ICLR 2026.
It is available at arXiv:2603.15569 and on OpenReview. The official code repository is at github.com/state-spaces/mamba under the MIT license. The PDF from the ICLR proceedings is also directly available at openreview.net/pdf?id=HwCvaJOiCj.
FACT: Mamba 3 achieves comparable perplexity to Mamba 2 using only half the state size, eliminates the causal convolution overhead, introduces complex-valued states, and adds a MIMO formulation for improved accuracy without decode latency cost.
The total accuracy improvement of the MIMO variant is +1.8 percentage points over Gated DeltaNet (the next best model). Mamba 3 also removes the short causal convolution and activation function that Mamba 2 required, reducing both architectural complexity and compute overhead during inference. The inference-first design philosophy was fundamentally absent from Mamba 2.
FACT: Mamba 3’s O(1) inference memory means it can encode text chunks of any length into fixed-size hidden-state vectors, making it inherently compatible with vector database indexing used in RAG architectures.
In a RAG pipeline, Mamba 3 encodes each document chunk into a fixed-size embedding regardless of chunk length — a key advantage over Transformer encoders where embedding cost grows with token count. At retrieval time, the same model generates a query embedding, cosine similarity finds the top-k chunks, and Mamba 3’s generation capability produces the final answer — all with constant per-token memory cost.
FACT: Mamba 3 via the mamba-ssm library requires a CUDA-capable GPU (NVIDIA) and PyTorch 2.0+; CPU-only inference is not natively supported in the current release.
The model is optimized for modern GPU tensor cores (A100, H100) and uses CUDA custom kernels for efficient state updates. Unlike Transformer inference, where KV cache grows and causes GPU memory fragmentation, Mamba 3’s constant state size means GPU memory is fully predictable — enabling precise batch size optimization. For cloud deployment, any CUDA-capable instance (AWS p3/p4, GCP A100) is compatible.
Conclusion: Mamba 3 and the Future of Efficient AI Architecture
The Transformer has been the undisputed backbone of language AI for nearly a decade. But as the industry pivots from training-centric to inference-centric deployment — driven by agentic workflows, real-time applications, and test-time compute scaling — its quadratic memory and compute requirements are no longer acceptable at scale. Mamba 3 is the most credible answer to this challenge that exists today.
By rethinking SSM design from an inference-first perspective, Mamba 3 achieves three things simultaneously: it’s more accurate than any prior SSM (1.8 pp gain at 1.5B), more efficient in state representation (50% state size reduction), and more hardware-friendly (higher arithmetic intensity, no memory-bound decoding). The Mamba 3 state space model doesn’t just improve on Mamba 2 — it redefines the benchmark every efficient architecture will be measured against.
For AI engineers, RAG pipeline architects, and developers building production LLM systems in 2026: structured, semantically-rich content processed through Mamba 3’s complex-valued states retrieves better, generates faster, and scales further than anything Transformer-based inference can offer at equivalent parameter count. The future of sequence modeling is linear, constant-memory, and inference-first. Mamba 3 is that future.
Related reading: RAG Pipeline Implementation Guide · LLM Inference Optimization · Transformer vs SSM Deep Dive · AI Agent Architecture 2026
Build Faster AI Systems with Mamba 3
Get our full implementation guide, RAG integration templates, and benchmark scripts for deploying Mamba 3 in production. Stay ahead of the inference efficiency curve.
🚀 Get the Implementation Guide